DIY Fabric Headboard
You’ll need:
• Upholstery weight (ideally) fabric (Spotlight or your favourite store)
• Batting - I used an extra thick batting, be sure to get the width you need to cover your plywood or card
• Plywood or cardboard (local hardware shop or repurpose something lying around)
• Staple gun (& staples!)
• Heavy duty mirror/picture hanger (we recommend Hangman Heavy Duty Mirror and Picture Hanger from Mitre 10 but you can use whatever suits you!)
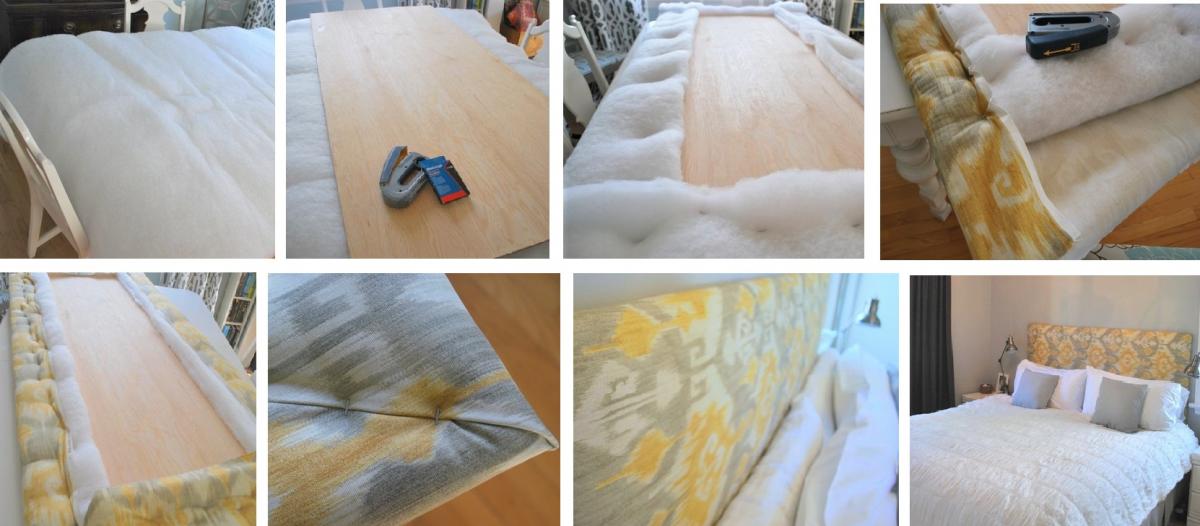
Step 1. After laying the batting out on my tabletop, I put my sheet of plywood on top. The size of your plywood will depend on the size of your bed. Wrap the batting around the plywood and start stapling it down with a staple gun. Just staple your way all around the board. Super easy.
Step 2. Once the batting was secured, I laid out the fabric with the patterned side down. I gave it a quick ironing to get out any wrinkles before starting. After placing my plywood on top of the fabric, it was time to start stapling the fabric. I started off by doing the two long sides. I made sure to pull it tightly as I was going so that it wouldn’t be too loose in the front.
The corners are the part you want to be careful with. My technique (and I’m not sure if this is the “right” way or not, but it worked) is to approach it like I was wrapping a present. I get one side stapled, and then fold it in to the un-stapled side. Then I bring that piece up and pull it really tightly and staple along the seam. It takes a bit of practice, but I would just do it a few times until I got the perfect seam and then staple ‘er down.
Step 3. Now came the tricky part of actually hanging it. We wanted to attach it directly to the wall rather than to our bed. We searched around and finally came across a Heavy duty mirror / picture hanger (Mitre 10, Bunnings probably has similar) Simply mount one track on mirror or picture, then install the wall track with included anchorless fasteners.
We’re really happy with how it turned out. The colours are just right and it’s nice to bring another textile into the room. Plus, it makes our basic bed look about a million times nicer and more expensive!
Full tutorial with pictures: diyshowoff.com...
Neighbourhood Challenge: Who Can Crack This One? ⛓️💥❔
What has a head but no brain?
Do you think you know the answer? Simply 'Like' this post if you know the answer and the big reveal will be posted in the comments at 2pm on the day!
Want to stop seeing these in your newsfeed?
Head here and hover on the Following button on the top right of the page (and it will show Unfollow) and then click it. If it is giving you the option to Follow, then you've successfully unfollowed the Riddles page.

Scam Alert: Fake information regarding December Bonuses from MSD
The Ministry of Social Development is reporting that fake information is circulating about new ‘December bonuses’ or ‘benefit increases’
If you get suspicious communication, please contact Netsafe.

Poll: Are Kiwis allergic to “exuberance”? 🥝
In The Post’s opinion piece on the developments set to open across Aotearoa in 2026, John Coop suggests that, as a nation, we’re “allergic to exuberance.”
We want to know: Are we really allergic to showing our excitement?
Is it time to lean into a more optimistic view of the place we call home? As big projects take shape and new opportunities emerge, perhaps it’s worth asking whether a little more confidence (and enthusiasm!) could do us some good.

-
42.5% Yes
-
32.7% Maybe?
-
24.8% No
 Loading…